Part3-1 개요
실전에서 사용할 수 있는 Tensorflow와 pytorch 사용
모델의 성능향상에 필요한 추가 기본방법
캐글이나 실전에서 필요한 방법들 소개
정제되지 않은 외부데이터 불러오고 분석하는 방법 진행
모델을 저장하고 임베딩하는 방법 설명
1) custom한 데이터 넣는방법
2) 이미지 전처리
- 데이터를 다듬어서 넣어야하기 때문
3) Augmentation
- 데이터를 증폭시키는 방법
- 다양한 환경에 적응할 수 있도록 데이터에 변화를 줌
4) Callbacks
- epoch, step 단위로 이벤트를 일으키는 옵션
- 정해진 타이밍에 실행
- 대표적인 예 Checkpoint
5) 모델 저장 및 불러오기
- 다른사람에게 모델을 넘기려면 저장이 필요
Part3-2 데이터준비
직접 png파일 다운받고 사용해보는 과정
데이터를 구매/수집/커스터마이즈 하는데 도움이 되기 위함
os : window 내 폴더생성 등 외부적인 요소에 사용
glob : 전체경로에서 특정확장자를 추출
PIL : 이미지 열때 사용
import os
from glob import os
import numpy as np
import tensorflow as tf
from PIL import Image
import matplotlib.pyplot as plt
glob로 특정확장자가 붙은 파일의 전체경로를 가져올 수 있음
glob('dataset/mnist_png/training/*/*.png')
>>> ['dataset/mnist_png/training\\0\\1.png', ....]
Part3-3 데이터분석
귀찮아도 꼼꼼하게 보고 넘어가야 나중에 실수할 가능성이 낮아짐
데이터 개수비교
 라벨이 10개 있음, 데이터 이동, 복사할 수도 있으므로 확인하는 것이 중요
label_nums = os.listdir('dataset/mnist_png/training/')
label_nums
>>> ['0', '1', '2', '3', '4', '5', '6', '7', '8', '9']

nums_dataset =[]
for lbl_n in label_nums:
    data_per_class = os.listdir('dataset/mnist_png/training/'+ lbl_n)
    nums_dataset.append(len(data_per_class))
nums_dataset
>>> [5923, 6742, 5958, 6131, 5842, 5421, 5918, 6265, 5851, 5949]

plt.bar(label_nums, nums_dataset)
plt.title('Number of Dataset per class')
pillow로 열기
path = data_path[0]
image_pil = Image.open(path)
image = np.array(image_pil)
image.shape
>>> (28, 28)
plt.imshow(image,'gray')
tensorflow로 열기
tensor로 열기위해선 채널이 필수적
grayscale이어도 1채널 부여
gfile = tf.io.read_file(path)
image = tf.io.decode_image(gfile)
image.shape
>>> TensorShape([28, 28, 1])
plt.imshow(image[:,:,0], 'gray')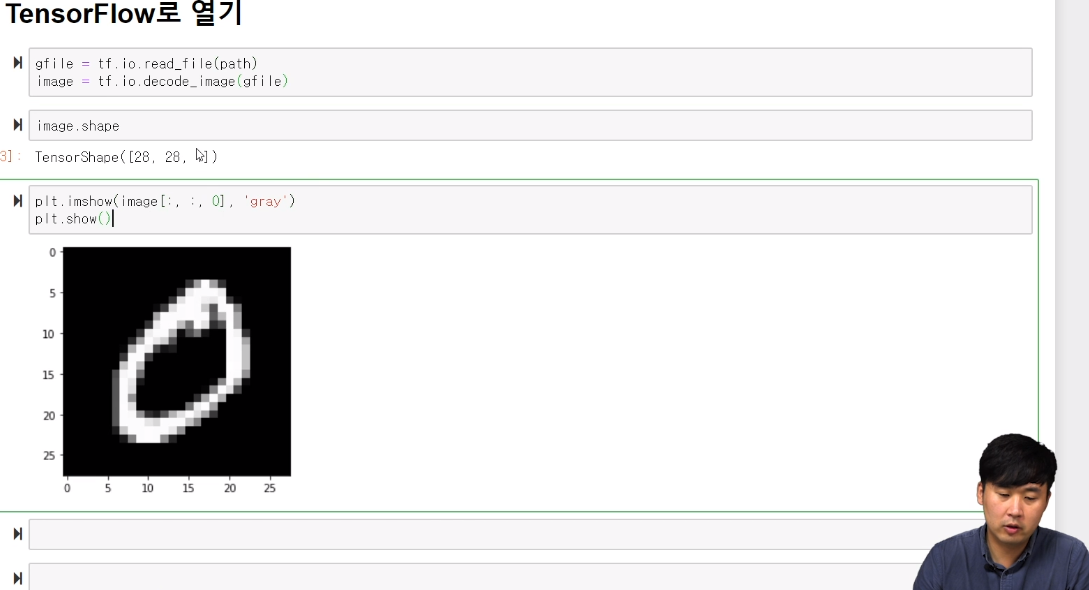
lable얻기
label = path.split('\\')[-2]
label = int(label)
def get_label(path):
    class_name = path.split('\\')[-2]
    label = int(class_name)
    return label
path, get_label(path)
>>> ('dataset/mnist_png/training\\0\\1.png', 0)
데이터 이미지 사이즈 알기
실제로 프로젝트를 하다보면 각 이미지의 사이즈가 다를수 있음
input 크기가 정해져 있기 때문에 resize를 해야하나
작은걸 키우는 것도 문제, 큰걸 줄이는 것도 문제가 있기 때문에 확인 필요
사이즈가 안맞으면 평균값 또는 중앙값으로 조절해야 할 것
heights = []
widths = []
for path in tqdm(data_path):
    img_pil = Image.open(path)
    image = np.array(image_pil)
    h, w = image.shape

    heights.append(h)
    widths.append(w)

 # 시각화
plt.figure(figsize=(20,10))

plt.subplot(121)
plt.hist(heights)
plt.title('heights')
plt.axvline(np.mean(heights),color = 'r', linestyle = '--', linewidth = 5)

plt.subplot(122)
plt.hist(widths)
plt.title('widths')
plt.axvline(np.mean(heights),color = 'r', linestyle = '--', linewidth = 5)
'책&강의 학습 > 올인원 패키지 :딥러닝&인공지능' 카테고리의 다른 글
| [패스트캠퍼스 수강 후기] 인공지능강의 100% 환급 챌린지 11회차 미션 (0) | 2020.07.09 |
|---|---|
| [패스트캠퍼스 수강 후기] 인공지능강의 100% 환급 챌린지 10회차 미션 (0) | 2020.07.08 |
| [패스트캠퍼스 수강 후기] 인공지능강의 100% 환급 챌린지 8회차 미션 (0) | 2020.07.06 |
| [패스트캠퍼스 수강 후기] 인공지능강의 100% 환급 챌린지 7회차 미션 (0) | 2020.07.05 |
| [패스트캠퍼스 수강 후기] 인공지능강의 100% 환급 챌린지 6회차 미션 (0) | 2020.07.04 |


댓글